Combining painting with photography
I've always thought of digital photographs as great big "color by number" paint sets. Much of my inspiration for wanting to combine painting and photography comes from studying Pictorialist photographs from the late 19th/early 20th century. There might be a connection between the preceding two sentences.
This article illustrates several approaches that I've been exploring as ways to incorporate painting with photography.
Written November 2016.
Introduction
I've always thought of digital photographs as great big "color by number" paint sets. Much of my inspiration for wanting to combine painting and photography comes from studying Pictorialist photographs from the late 19th/early 20th century. There might be a connection between the preceding two sentences.
This article illustrates several approaches that I've been exploring as ways to combine painting and photography.
Smudging, recoloring, and painting from a reference photograph
Smudge-painting a photograph


In some quarters smudge-painting has the reputation of being a good way to make photographs look like bad paintings (which might be exactly what I did to my morning glory photograph). Nonetheless, smudge-painting is a useful tool for augmenting traditional photographic editing. I somewhat wonder if perhaps photographer Cheryl Medow featured in National Geographic incorporates smudge-painting techniques to produce her rather amazing composite bird photographs. Smudge-painting would be one way to get the beautifully smooth and carefully augmented colors that characterize her composites. If she does use smudge-painting, she applies it with a great deal of skill and restraint.
As much as I like using GIMP-CCE for painting, GIMP's smudge brush isn't nearly as capable as Krita's. Krita's smudge brush engine allows you to produce the smudged image on a new transparent layer by pulling colors from the underlying layers, which allows quite a bit of ease when reworking any given area of the image. And Krita's smudge brushes allow you to put down new color even as you smudge existing colors. (update: GIMP 2.9 now does have the ability to put down new color while smudge-painting, and it's possible that smudging on a new transparent layer by pulling colors from underlying layers might be added.)
Using color blend layers and a brush to recolor a photograph


The "from the camera" colors weren't very pretty, so I used Krita and GIMP-CCE to recolor the image. The screenshots below show the Krita and GIMP-CCE layer stacks for the "Old lamp post" image. In Krita, the color layers were set to the HSY Color blend mode, and the colors were applied by painting on the masks to reveal each layer's color. In GIMP-CCE the Krita-produced colors were fine-tuned using GIMP's LCH blend modes:

I used Krita's HSY Color blend mode for the initial recoloring of the "Old lamp post" image because when I started working on the image, GIMP didn't have LCH layer blend modes. Not too long after I finished the initial recoloring in Krita, LCH blend modes were added to GIMP. I wrote some additional code to add LCH color pickers and a Hue-Chroma tool to GIMP-CCE. Today default GIMP 2.9 also has LCH color pickers and a Hue-Chroma tool, though as of September 2017 default GIMP 2.9 code only works for sRGB images (I think GIMP 3.0 will support editing in other RGB working spaces).
When photographic editing isn't working, try painting
IMHO, in the "on hover" image below, the camera-saved jpeg (image 1) has a nice composition. But it doesn't capture the emotion I felt in response to the scene when I took the picture, and my normal photographic editing techniques (image 2) weren't bringing the image any closer to capturing that emotion. So I used the photograph as a "reference photograph" for a painting (image 3):


I did most of the painting for "Jet trails" in Krita, and worked in GIMP-CCE to adjust the colors and tonality. I can't say the image is finished, but the painted image (slide 1) is closer to what I wanted than I was able to achieve using standard photographic editing (slide 3). I was mostly interested in painting the sky and jet trails, as these are the elements in the original photograph that just didn't quite capture the emotion of the moment. I would cheerfully have just cut and pasted the hilltop and tree from the photograph over the painted sky, but I wasn't able to make a proper selection that kept the vegetation without also including a fringe of sky. So I used a fine brush to trace over the fringe of vegetation along the top of the hill.
Verdaille painting compared to split toning and coloring a black and white photograph
A verdaille painting is a painting made using just green colors, and can be done by painting on a neutral or non-neutral background. In a verdaille painting using various shades of green on a light color background:
- Typically the background color will dominate in the highlights, and green colors will dominate in the shadows.
- But as layers of paint can be built up anywhere desired (and assuming the artist makes use of various lighter and darker green colors), verdaille painting provides some "independent of tonality" control over which areas in the image will be greener and which will be closer to the background color.
In the "wet" darkroom, when adding color to a black and white photograph:
- If the image has been split-toned in the wet darkroom, one color will appear in the highlights, and the other in the shadows, as toning is a process that differentially affects shadows and highlights. So in the digital darkroom, by analogy luminance-based masking is one way to partially (emphasis on partially!) emulate wet darkroom split toning.
- Other "wet" methods of adding color to a black and white photograph (hand coloring using dyes or paints, the gum bichromate process, etc) allow more control for whether and to the degree that a given color appears in the shadows or highlights.
A partially successful attempt to replicate the colors in a verdaille painting using LCH color blend modes and luminance-based masking
I came across Pillemente's lovely (and public domain) verdaille oil painting A chinoiserie procession of figures riding on elephants with temples shortly after the LCH blend modes were added to high bit depth GIMP. I was already experimenting with split toning and coloring digital black and white photographs. So as an exercise I decided to see how closely I could replicate Pillemente's colors by using the LCH color blend modes with luminance-based masking. So I made a Luminance-based conversion to black and white of Pillemente's painting, and then applied colors to the resulting black and white image using high bit depth GIMP's LCH blend modes:
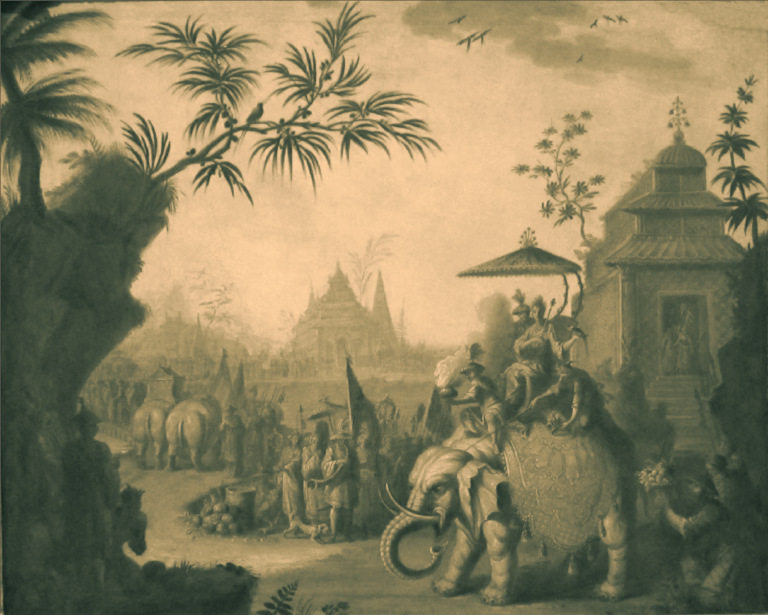


The slideshow above above allows easy comparision between Pillemente's original colors (slide 4) and the colors that resulted from using the LCH color blend mode plus luminance-based masking (slide 3). The colors produced using luminance masks and LCH color blending using the layer stack shown in slide 2 are pretty close to Pillemente's original colors. But to get a complete visual match I'd have to use a brush to selectively lighten and darken various areas on the layer masks, and maybe also to selectively modify the chroma of the color layers. Both images have the same tonality. But Pillemente's reds and greens are more intense and in places somewhat depart from "redder in highlights and greener in shadows", which implies that Pillemente used a neutral dark pigment in addition to a dark green pigment. This is especially evident in the clouds in the upper right corner.
The procedure I used to emulate Pillemente's "en verdaille" colors can be used for making digital art (though GIMP is currently the only image editor that allows to use LCH blend modes), and of course the same type of layer stack can be used to split tone, tint, or recolor a black and white photograph:
- If strictly luminance-based masking is used, the photograph will be split-toned.
- If the color layers are masked based on the objects in the image (instead of on tonality), the photograph will be tinted or colored, which in pre-digital days required using a brush and dyes or pigments, and so very clearly combined photographic and painting techniques.
- In the digital darkroom, one might argue (though I would disagree) that merely coloring a black and white image isn't really combining photography and painting. But if brush work is used on the masks or on the color layers, then photographic processing has definitely crossed the line into combining painting and photography.
Recoloring a black and white image using a Pictorialist color palette


My goal for the Turning Stone Casino image was to process and recolor a digital black and white photograph to have a tonal range and color palette similar to Edward Steichen's Road into the Valley — Moonrise. I used GIMP-CCE's LCH color pickers to ascertain the range of colors found in reproductions of Road into the Valley — Moonrise that have been posted to the internet: LCH Hues ranged from around 90 (yellow) to around 200 (a very green shade of blue), LCH Lightness ranged from 10 to 20 for the low (depending on which reproduction you look at) and 70 to 80 for the high (again, depending on which reproduction you look at), and LCH Chroma ranged from around 5 in the shadows to as high as 25 or 30 in the midtones and highlights.
Slide 1 above shows the Layers and Layer groups that were used to color the black and white starting image. The Color group is set to Normal blend mode and the Tonality group is set to Lightness blend mode. The separate Chroma group allows to fine tune the overall image colorfulness. With this arrangement of Layer Group blend modes, the Lightness values of the layers in the Color group doesn't matter because the Lightness of the Tonality group determines the final color.
There is of course much more to an image than the color palette and tonal range. Steichen's image has a much darker overall tonality, which allows the colors in the sky to seem to glow. Also consider the level of detail — the simple shapes and masses in Steichen's image were quite intentional (and not the accidental result of not having sharp lenses). For a long time I just assumed the Pictorialists were using early lenses that couldn't make a sharp capture. But in fact lenses of the time were capable of making sharply focused exposures. And so forth. And so on. Like I said, my very limited goal was to process a black and white image to have a color palette and tonal range similar to Steichen's Road into the Valley — Moonrise.
As an aside, some of Steichen's color prints are from gum bichromate processing over the original black and white print. But Road into the Valley — Moonrise is always described as "hand-toned photogravure", which seems to involve using a brush to paint dyes onto the photogravure print.
Recoloring a photograph using RGB plate replacement


My husband took a photograph of the Ponte de Amizade and I processed the photograph to hopefully evoke the feeling of a rainy tropical evening (we are still debating whether we prefer the original or modified image). To make the modified image I used an approach that I'll refer to as "RGB plate replacement" for want of a better term:

The screenshots above show two plate replacement layer stacks:
- The layer stack on the left simply reproduces the original image (Figure 7, Slide 1). In this layer stack the "Red" in the Red group is the color of the RGB color space primary, which is to say the color (1.0, 0.0, 0.0). And similarly with the "Green" and "Blue" in the Green and Blue groups.
- The layer stack on the right shows an example of what happens if you replace the original RGB primaries plate colors with new colors (Figure 7, Slide 2).
RGB plate replacement is a versatile way to modify an image. In addition to just changing the plate colors, you can:
- Paint more than one color on any or all of the Red, Green, and Blue "Multiply" layers
- Change the opacity of any or all of the layers or groups
- Add a mask to any or all of the layers or groups
- In the Red, Green, or Blue plate groups:
- Modify the tonality of the channel layer using a brush, or paint an entirely new channel.
- Modify the channel layer tonality using standard photographic editing (sharpening, Curves, etc), or replace the channel with a different channel from the same or a different photograph.
- Leave one or two of the plate groups out altogether or add additional plate groups
- And of course make a "New from Visible" layer and continue on with whatever additional painting or photographic editing procedures you might like.
Conclusion
Well, I don't actually have a conclusion, except to note that digital painting and digital photographic editing already share a lot of "in common" concepts and procedures, even before one thinks about combining painting with photography. Hopefully you might find some of the techniques described above for combining digital painting and photography to be interesting or even useful. Comments and suggestions for improving the article of course are welcome.
This article originally was almost twice as long as it is now. So I moved the section on color mixing and blending using Addition, Subtract, Divide, and Multiply blend modes to a separate article: Painting and blending colors using Addition, Subtract, Divide, and Multiply blend modes.