A tutorial on GIMP's very awesome LCH Blend Modes
This tutorial introduces the very awesome GIMP LCH blend modes and provides examples using the LCH blend modes first to repair a color image, and then to colorize a black and white rendering of the repaired color image. Results using the LCH blend modes are compared to results using the old HSV blend modes.
Written March 2015. Updated June 2016.
Introduction: GIMP's new LCH color blend modes
From bug reports, good things happen
Back in 2006 a bug report was filed that asked for GIMP's color blend modes to emulate PhotoShop's color blend modes. GIMP attracts some pretty talented programmers, and the original bug report morphed into code that provides GIMP with the ability to blend colors using "LCH" blend modes in place of the HSV blend modes. The LCH blend modes never made it into GIMP 2.8, but are available in high bit depth GIMP 2.9/2.10.
Default GIMP vs my patched GIMP
This tutorial assumes you are using default GIMP 2.10, which is an "sRGB only" image editor. When using default GIMP, if you try to edit images in color spaces other than the GIMP built-in sRGB color space, many editing operations will produce wrong results, including the LCH blend modes and converting to black and white using Luminance. If you use default GIMP, make sure to change the Precision to "Linear light", or else your layers won't blend properly.
My patched GIMP allows you to edit in any well-behaved RGB working space. To follow this tutorial using my patched GIMP, first convert your image layer stack to one of the linear gamma RGB ICC working space profiles included in my well-behaved ICC profile pack (the linear gamma profiles all have file names ending in "-g10.icc"). In my patched GIMP, if the image isn't in a linear gamma RGB working space, the LCH blend modes, the conversion to black and white using Luminance, and various other editing operations will be affected by "gamma errors" and so will produce wrong results.
Processing notes: The images on this page were processed at 32-bit floating point precision using my patched version of high bit depth GIMP 2.9 and working in a linear gamma version of the sRGB color space ("sRGB-elle-V4-g10.icc" from my profile pack). All the steps in the tutorial were subsequently tested in default GIMP, but I don't actually use default GIMP for image editing.
LCH: Lightness, Chroma, Hue
"LCH" stands for "Lightness, Chroma, Hue". LCH is mathematically derived from the CIELAB reference color space, which in turn is a perceptually uniform transform of the CIEXYZ reference color space. Very roughly speaking:
- LCH Lightness corresponds to HSV Value.
- LCH Chroma corresponds to HSV Saturation.
- LCH Hue corresponds to HSV Hue (the names are the same, but the two blend modes are based on very different mathematics).
- LCH Color is a combination of LCH Chroma and Hue, and corresponds to HSV Color, which is a combination of HSV Hue and Saturation (again, the names are the same, but the two blend modes are based on very different mathematics).
Section B below shows how to use the LCH blend modes to repair blown-out highlights in camera-saved jpeg. Section C shows how to use the LCH blend modes to colorize a black and white rendering of the repaired image.
Using LCH to repair a color image
Unlike the HSV Color and Value blend modes (which mangle the image's color and tonality), LCH blend modes allow you to separate corrections to LCH Color from corrections to LCH Lightness. This means the LCH blend modes are extremely powerful tools to use when repairing color images. Following is an example of repairing a flawed photograph using the LCH Color and Lightness blend modes:

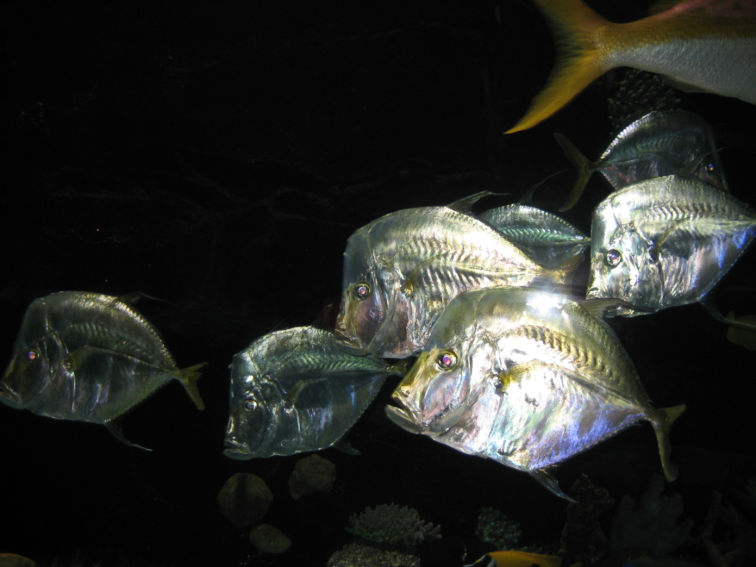
The image shown above is a "straight from the camera" jpeg image of some aquarium fish. It's not a bad picture, but there are some obvious flaws:
- The fish on the extreme left is "kissing" the edge of the frame, so he needs a little more room to move into.
- The picture was taken with a point and shoot camera using the on-camera flash, which caused great big patches of blown highlights, especially evident on the front fish's body.
- The picture also has a moral flaw, which is something GIMP and the LCH blend modes can't fix: When I took the photograph I failed to consider that maybe fish don't like camera flashes going off in their faces. The next time I take pictures of fish in an aquarium, I will think more carefully about the fish themselves.
Using LCH blend modes to repair the aquarium fish image
The front fish in the original aquarium fish image has a badly blown out body. Fortunately I had another photograph with just one fish of the same species, which I resized and rotated to use for patching detail into the blown out areas of the front fish's body.
The colors in the two fishes weren't at all the same. So I converted both images to black and white using "Colors/Desaturate/Luminance", which is, since version 2.9.2, high bit depth GIMP's radiometrically correct replacement for the old "Colors/Desaturate/Luminosity". The Luminance option retains the original color image's relative luminance.
I patched in portions of the second fish as needed to fill in the missing body detail. Then I restored color to the patched black and white image by blending the original color image layer over the repaired image layer using the LCH Color blend mode. The next figure below shows the steps to repair the front fish and compares results using the LCH versus the HSV Color blend modes to restore color to the repaired black and white aquarium fish:

The figure above shows the steps for repairing the front fish with the blown out body detail:
- Top row: Patching in details for the front fish
- Front fish with a badly blown out body from using the on-camera flash, after being converted from color to luminance.
- Second fish of the same species, resized and rotated to approximately match the first fish, and converted from color to luminance.
- Front fish detail filled in.
- Bottom row: Restored color to the desaturated and patched front fish
- Color restored using the HSV Color blend mode: the colors are splotchy, with patches of 100% saturated colors sprinkled over the fish.
- Color restored using the LCH Color blend mode: the colors look natural.
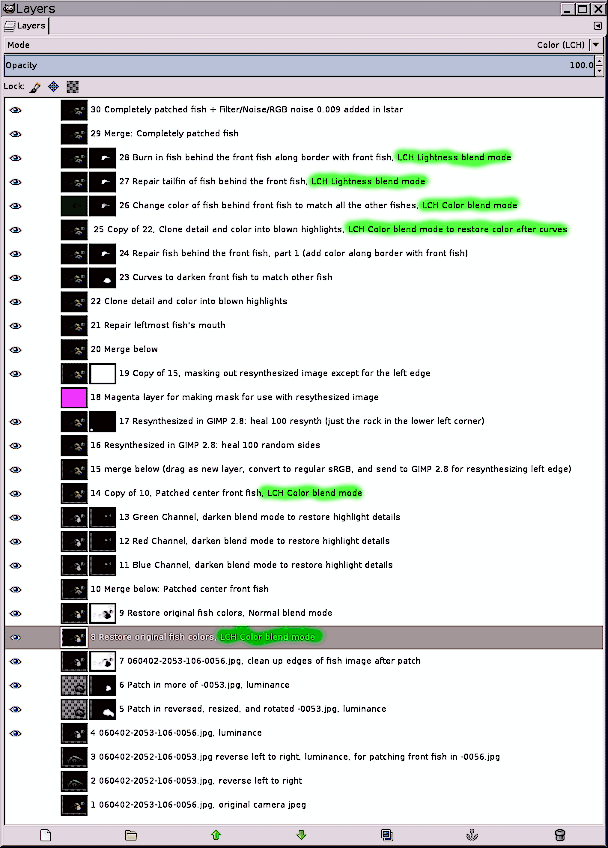
In case you are curious, the screenshot below on the right shows the layer stack that was used to repair the original aquarium fish photograph, and below that is the repaired image:
-
 As discussed above, the first ten layers (numbered 1 through 10 in the screenshot) were used to patch in the badly blown out body of the front fish. Layer 8 is the layer that was used to restore the original color to the patched front fish.
 - Layers 11 through 15 retrieved whatever highlight detail was available in the individual red, green, and blue channels, and again the original color was restored using the LCH Color blend mode (Layer 14).
- Layers 16 through 21 used the Resynthesizer plug-in and some cloning work to extend the left edge of the image so the fish on the left edge has a little room to swim into.
- Layers 22 through 28 used the Clone and Dodge/Burn tools and also Curves to repair the remaining blown highlights and various other defects in the original image. Some of the cloning was done using LCH blend modes.
- Layer 29 is a merge of all the layers below. Layer 30 adds a very small amount of perceptually uniform RGB noise (visually indetectible even at 400% magnification) to fill in the gaps in the histogram of the repaired image, which after all did start as an 8-bit camera-saved sRGB jpeg.
In my patchd GIMP, adding perceptually uniform RGB noise is best done by dragging the layer out as a new layer and converting it to an RGB working space with a true perceptually uniform TRC (for those of you using default GIMP, the sRGB TRC is only approximately perceptually uniform). In my ICC profile pack the profiles with perceptually uniform TRCs all have file names ending in "-labl.icc".
The next image shows the repaired aquarium fish image:

Well, maybe it's not perfect, but IMHO the repaired image shown above is a considerable improvement over the the image that came straight out of the camera.
Repairing the aquarium fish image was made considerably easier by using GIMP's new LCH blend modes. As shown in the screenshot of the repair layer stack, layers 8, 14, 25, 26, and 27 used the LCH Color and Lightness blend modes. These two blend modes allow you to independently change a layer's Color (CIELAB Color) and Lightness (CIELAB Lightness). You probably already know that when using the HSV Color and Value blend modes, attempts to change Color and Value independently fail miserably. So if you spend much time repairing or modifying color images, you will find GIMP's new LCH blend modes to be invaluable.
Using LCH to colorize a black and white rendering
Cyanotypish Fish
When I selected the aquarium fish picture for trying out GIMP's new LCH blend modes, my artistic goal wasn't just to repair the image. Rather I wanted to make a black and white rendering of the aquarium fish and then practice colorizing it using the LCH blend modes.
My previous efforts at colorizing black and white renderings using GIMP's HSV and Krita's (better but still not great) assorted HS* blend modes had been a bit of a struggle. Colorizing a black and white image using GIMP's new LCH blend modes turned out to be pretty straightforward — my digital darkroom time was spent figuring out which colors to use and how best to blend them together; no time was wasted fighting the inadequacies of the HSV blend modes:

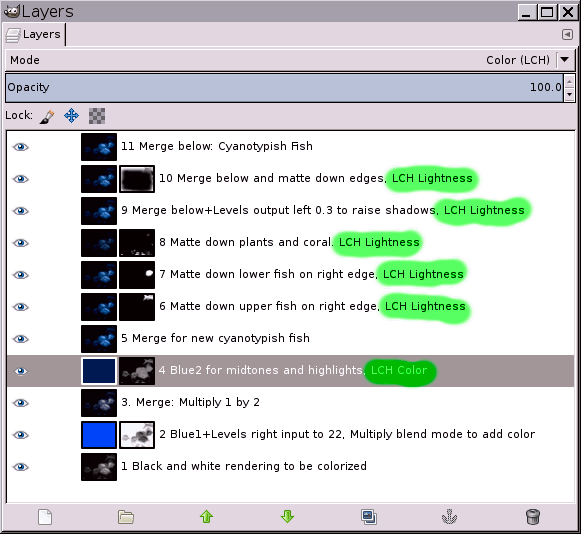
 The Cyanotypish Fish image shown above is a colorized black and white rendering of the repaired aquarium fish image shown in the previous section of this tutorial. The screenshot on the right shows the layer stack:
The first step, of course, was to convert the aquarium fish to a black and white image suitable for colorizing, and that's layer 1 in the layer stack (I didn't start with a straight luminance conversion; the shadow areas in layer 1 are much lighter than in the original color image).
The "monotone" blue rendering was actually produced using two different shades of blue: The first blue layer (layer 2) was set to the Multiply blend mode to simultaneously darken and put the first shade of blue into the black and white rendering, producing layer 3. The second blue layer (layer 4) was set to the LCH Color blend mode, and was masked to only affect the midtones and highlights, producing layer 5, which has slightly different shades of blue for the fish and the background.
Layers 6 through 10 were used to establish the final tonality for the Cyanotypish Fish image. These layers all used the LCH Lightness blend mode in order to avoid the hue and saturation shifts produced by using Curves to modify tonality. I would refer you to discussions on the topic, but they seem to have vanished from the internet, having been replaced by discussions of software you can buy that will do all your editing for you.
Changing the color of the Cyanotypish Fish
 When colorizing a black and white image, it's very common to change one's mind about what colors to use. Let's say I want two more versions of the colorized black and white rendering shown above. Let's say I want to keep the existing tonality, and I want a version with a somewhat more purple shade of blue, and also a version that's yellow. Unlike using the HSV Color blend mode, using the LCH Color blend mode makes this task trivially simple. The original version is shown to the right for easy reference and comparison to the purple-blue and yellow versions shown below:

In the above figure:
- The leftmost column shows the color to be blended over the Cyanotypish Fish image.
- The center column shows the result of using the LCH Color blend mode: the colors have been changed and the image retains its original tonality. Changing colors doesn't get any easier than that — one HCL Color blend mode layer and the job is done.
- The rightmost column shows the result of using the HSV Color blend mode. When using the HSV color blend mode, the bright yellow made the image brighter and the dark blue made the image darker. Also, the blue version looks oversaturated and the yellow version looks muddy instead of crisp. In either case, reestablishing the original tonality would require a whole lot of work.
The conclusion is pretty obvious: if you want to change colors in an image, use the LCH Color blend mode. Unlike the HSV Color blend mode, the LCH Color blend mode lets you change image colors without radically altering tonality at the same time.
Conclusion and notes: You will love using GIMP's new LCH blend modes
If you ever repair color images, colorize black and white images, or change the colors in a color image, then once you try GIMP's new LCH blend modes, you will love using them. Unlike the HSV Color blend mode, the LCH Color blend mode allows you to change the color of an image without radically altering tonality at the same time. And unlike the HSV Value blend mode, the LCH Lightness blend mode allows you to change tonality without radically altering color.
HSV/L/I are mathematical constructs defined relative to the RGB working space that the image happens to be in. These blend modes were created for fast computation on computers from the 1990s, and produce results with very little relation to how we humans actually perceive color in the real world. LCH goes far towards capturing how we actually see colors and changes in colors, and so will allow you to modify colors with a lot more control and finesse than you can using HSV/L/I.
Even so, do pick your colors with a degree of discretion: The LCH blend modes don't protect your image from the ill effects of blending injudiciously chosen colors over your original image. Unlike using the HSV Color blend mode, when using the LCH blend modes you can very easily create out of gamut colors if you blend colors with a high chroma. Use your eyedropper to check for RGB channel values that are less than zero or greater than 1, and if you see such values, think about picking a less colorful color. Or at least be aware that those out of gamut colors will be clipped upon export as an sRGB jpeg for the web.